"Transfers" are images which are applied to a surface by releasing them from a carrier layer.

![]()
(Left: from Letraset's original patent. Right: illustration of the layers in a Letraset transfer.
You can see these in more detail on our page "How Dry Rub-Down Transfers Work".)
Generally, transfers consist of several layers of material:
- a CARRIER LAYER, often paper or plastic, which is disposable once the transfer image has been applied
- the CARRIER LAYER ADHESIVE or wax, temporarily binding the image to the carrier layer
- the IMAGE itself (which may, in turn, comprise several layers of material and inks or dyes)
- the IMAGE HALO, a clear film on which the image is printed
- the SURFACE ADHESIVE on the underside of the image halo, to bond the image permanently to the recipient surface
- a PROTECTIVE LAYER of waxed tissue paper or similar, to prevent the image accidentally transferring prematurely.
Some of these layers may be omitted in the less sophisticated methods. Often it is recommended that after applying a transfer, it is varnished for protection; varnish would, in a manner of speaking, form yet another layer.
There are several different methods of achieving the image transfer effect, chiefly among them:
- WATERSLIDE transfers. Moistening the transfer simultaneously dissolves the carrier layer adhesive & activates the surface adhesive.
- METHFIX transfers. These use a solution of methylated spirits rather than just water.
- HEAT & IRON-ON transfers. Here heating the transfer releases & activates the respective adhesives.
- DRY RUB-DOWN (or rub-on, rub-off, etc.) transfers. The application of pressure has the same effect as above.
- INSTANT PICTURES & ACTION TRANSFERS.
- TOPPS MAGIC RUB-OFFS, HASBRO RUB-ONS, & TRANS-ACTION. A markedly less sophisticated form of dry rub-down transfer.
Apart from the variety of different ways to achieve an image transfer, there are also a number of processes which are commonly grouped with, or mistaken for, transfers. This article will attempt to discuss each one briefly.
In particular, it is important to note that:
TRANSFERS ARE NOT STICKERS.
So for disambiguation, later on this page are some very short topics which should clear up any confusion:
- Decals
- Stickers
- Stick'N'Lift — ColorForms — Fuzzy-Felt
- Magic Rub-Off Pictures
- Silly Putty
- Embroidery Transfers — Transfer Pens & Pencils
- Tracing Paper
- Pouncing
- Projection — Camera Obscura — Camera Lucida
- Brass Rubbing
- Pantographs
- Stencils — Rotadraw
Then rounding off this first page, there's an interesting ad placed by Letraset once upon a time in a trade magazine:
To get a really good overview of how transfers work & what they're all about, we recommend you read through all the pages in this article. If you like, you can follow the links that appear in each section to view the other related pages, but we recommend that instead you wait until the end of this main page — where you will find all the links together in one handy group, right at the bottom.
Waterslide Transfers: Temporary Tattoos

![]()
(Left: Letraset Super Heroes Tattooze. Right: 1960s Temporary Tattoos.)
Temporary tattoos, otherwise known as "tattooze", are a form of waterslide transfers in which licking the skin is the usual method of applying moisture. They are the simplest and cheapest form, and do not require sliding away the carrier layer, which can simply be lifted off. This is more or less just a method of wetting ink so that it will leave an imprint wherever you stick it. Potato printing uses much the same idea, so this method is presumably prehistoric. Temporary tattoos, because they are so cheap to produce, are a staple of the confectionery industry, where they are commonly sold in sealed packets along with a piece of chewing gum.
• See our Temporary Tattoos page, including "How to Apply a Vintage 1960s Temporary Tattoo" →
True Waterslide Transfers
![]()

(Left: waterslide drinking glass transfers. Right: car window "bullet-hole" transfers.)
True waterslide transfers are more sophisticated, since they are designed to last longer; the image is protected by a tough transparent layer, which means that the carrier layer can be most safely removed by sliding it off the image when the carrier layer adhesive has dissolved sufficiently. This is the oldest true image transfer technology, dating back at least to the lithography boom of the 1860s. Among other uses, waterslide transfers are commonly used to apply markings to model kits and other curved surfaces, where they are the most suitable form of transfer, since the method of application is unlikely to damage the surface. They are also very popular for use on windows & mirrors.
• See our page demonstrating "How to Apply a Waterslide Model Kit Transfer" →
• See our page "Waterslide Transfers Applied to Drinking Glasses" (Plus Golly Transfers) →


(Left: Letraset's Type Lettering System in packet. Right: Sheet 42Q 'Tradition'.)
Letraset themselves used waterslide transfer technology in their patent "Type Lettering System". This was replaced by their own invention, dry rub-down transfers, for Instant Lettering from 1961 to present.
• See our page on "The Letraset Type Lettering System" →
• See our page demonstrating "How to Apply Vintage 1959 Letraset Waterslide Lettering" →
• See our page on Letraset's dry rub-down "Instant Lettering" →
Heat & Iron-On Transfers


(Left: Duplex Hot Sponge Transfers. Right: Charlie's Angels Iron-On Tee-shirt transfer.)
Heat transfers tend to be more durable than waterslide transfers, so they are used where permanence is a priority and where the application of heat will not cause a problem.
A very popular type of heat transfer is the iron-on transfer, where the heat is applied by a press or a domestic iron. This is common for applying transfers to fabrics or clothing, especially tee-shirts.
For hot iron transfer pens & pencils, see the section Embroidery Transfers below.
• See our page on Heat Transfers, including "How to Apply a Vintage 1970s Iron-On Transfer" →
Dry Rub-down Transfers


(Top left: Letraset Instant Lettering. Others: a variety of Letraset transfers.)
Known by a variety of different names, including "rub-on", "rub-off", and so forth, dry rub-down transfers were invented by Letraset in 1959 and involve the principle of applying pressure to the plastic carrier layer by means of a stylus (typically a pencil or ball-point pen). The carrier layer adhesive is a wax whose hold is weakened as the plastic is distorted by the pressure, while the surface adhesive keeps the image intact and in situ. A piece of waxy tissue paper protects the surface adhesive from sticking inappropriately before the transfer is ready to be applied, so the first step in the application of a dry rub-down transfer is to move this tissue aside so that it is clear of the designated transfer, while still protecting any other transfers which may remain on the same transfer sheet.
• See our page demonstrating "How to Apply Letraset Dry Rub-Down Transfers" →
• See our page showing "How Dry Rub-Down Transfers Work" →
Instant Pictures & Action Transfers


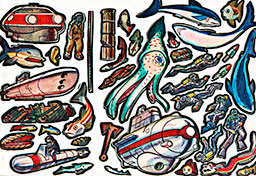
(A selection of Letraset Action Transfers.)
These are Letraset's dry rub-down transfers intended for children. "Instant Pictures" was the original title used from 1964, but since this could have caused confusion with Polaroid's camera system the name was dropped in favour of "Action Transfers" in 1969. In terms of technology, they are exactly the same as Letraset's other dry rub-down transfers (shown immediately above), but I've included them separately for the benefit of anyone coming to this article looking for a definition.
• See practically any page of this website; why not start with the "Browse" page? →
Topps Magic Rub-Offs, Hasbro Rub-Ons, & Trans-Action

![]()
(Left: Topps 1966 Baseball Rub-Offs. Right: Trans-Action D-Day Wargame.)
Borderline infringing Letraset's patent on dry rub-down transfers, for many years Hasbro were able to promote their own less-sophisticated technology with relative impunity. Essentially a method of smearing surfaces with smudges of pre-printed ink, these had some success in the US for several years, & now they have their own naive retro charm.
The Topps confectionery company first used this technique way back in 1961, & it has to be said in their favour that they beat Letraset to the use of colour in children's dry rub-down transfers by four years.
In the UK, a company called Trans-Action — run by an ex-director of Letraset — had a brief fling with patent infringement around 1975, using much the same idea.
Were these transfers inspired by Silly Putty? Probably not, but it's an interesting line of thought!
• See our page "Topps Rub-Offs, Hasbro Rub-Ons, & Trans-Action" →
Methfix Transfers
![]()
(Slater's Plastikard Methfix Transfers application instructions.)
There are several variations on the use of water as a solvent; shown here in passing is the "Methfix" version, which uses a strong solution of methylated spirits in water, the idea being that the transfers won't be accidentally ruined just by getting wet.
Decals
![]()


(A selection of décalcomanies.)
The word "decal" is short for "decalcomania" (from the French, "décalcomanie"; "décalquer" is the French verb 'to trace'). It originally referred to the craze for plastering surfaces with waterslide transfers, but nowadays more commonly (albeit incorrectly) a decal means a sticker, particularly in the US; see below for stickers. Here, we'll stick (arf!) with the original meaning of the term.
• See our page "Some Lovely Décalcomanies" →
Stickers


(Left: puffy stickers from Japan. Right: Letraset Action Stickers.)
Whereas a transfer applies an image to a surface by first holding the image to a carrier layer, stickers are the simpler and less elegant solution of supplying images with the adhesive already applied. So all you have to do is peel a sticker off its protective backing, and stick it where you want it. Most stickers are made of vinyl, although some use paper or other materials. Usually stickers are printed against a white background, so unless the cutting is accurate, you get a white border around the image; however, sometimes they're printed on transparent vinyl, in which case the edges are less obvious. There is a certain amount of confusion between transfers and stickers, but you can usually distinguish between them easily enough by looking for the opaque border or background which tells you it's a sticker. Dry rub-down transfers have a transparent background, and with waterslides, temporary tattoos, and heat slide transfers, the obvious clue is that you are looking at the reverse of the image — usually through a sheet of tissue.
Puffy Stickers are stickers which are puffy.
Laser Stickers are stickers which are… hmmm. (I'll get back to you.)
![]()

(Left: pre-spaced vinyl lettering. Right: Letrasign packets.)
Vinyl lettering in the form of stickers can be pre-aligned on the backing paper to ensure the individual characters are correctly spaced when applied. Letraset's own system for this is called Letrasign.
• See our Stickers page, featuring "How to Apply a Sticker" (& many other treats) →
Stick'N'Lift — ColorForms — Fuzzy-Felt


(Top left: Letraset Stick'N'Lift. Top right, bottom left: Simplay pieces. Bottom right: Key Facts "Deep Sea Adventure" — 'press on, lift off'.)
Neither transfers nor stickers (since no adhesive is required), Stick'N'Lift are flexible pieces of vinyl which can be temporarily fixed to a background by electrostatic attraction. Since this force is very weak, they can be easily removed & stuck down again, making it simple to reposition them, to play simple games, or to compose animations. If they lose their stickiness, they can be revived by washing in lightly soapy water.
ColorForms are a trademark for a variety of different products, but most commonly refer to a simple variety of Stick'N'Lift.
• See our "Stick'N'Lift" page →


(Left: Fuzzy-Felt "Pets". Right: Fuzzy-Felt "Farm".)
The same principle can be employed using magnetism rather than electrostatic force; fridge magnets and so forth can be printed as thin, flexible strips, giving the same effect as Stick'N'Lift with the added benefit of easy sliding. Fuzzy-Felt relies on the tendency of felt pieces to stick together, an idea culminating in Velcro-backed images.

(Right: British Airways Skydentikit.)
And of course, following this train of thought a little further, you can just use glue, tape or pins to stick images to a background; not to mention good old reliable gravity. CAUTION: please be careful, when using gravity to apply images, not to become trapped on the surface of the planet yourself.
Whitman "Magic Rub-Off Pictures"


(Left: Tarzan Magic Rub-Off box lid. Right: two of the Magic Rub-Off cards, before colouring. With thanks to Michael Lester.)
These are shiny sheets of card which are marked with the outlines of pictures in permanent ink. The outlines can be filled in with coloured wax crayons, after which the crayon marks can be rubbed off again and the card reused indefinitely. This is essentially the same principle as Whiteboards & Whiteboard markers. They are mentioned here simply for disambiguation, because the term "rub-off" has also used been used elsewhere to describe transfers.
Silly Putty
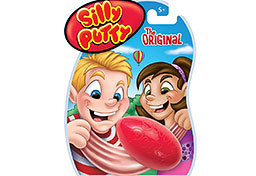
"Silly Putty" (now a trademark of Crayola, but also known by many similar names) has, among other unusual properties, the knack of picking up ink from the printed page, allowing it to be transferred to blank paper or other surfaces. This inevitably results in the image becoming distorted as the putty stretches, but in the eyes of children this would not be a bug so much as a feature.

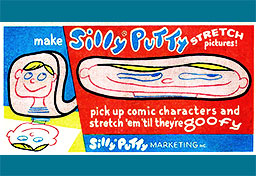


(Top: Silly Putty ad from Lois Lane No.52, October 1964; Magic Putty "New Transfer Solution". Bottom: Silly Putty picking up newspaper ink.)
As printing technology has moved on over the decades, so has the formulation of inks used in printing. Silly Putty used to be quite efficient at transferring residual images, but modern inks have largely undermined the effectiveness of this method.
You can get more-or-less the same effect with adhesive tape, or home-made alternatives to putty. This is not true transfer technology, since what is transferred is not the image itself so much as a ghost or echo of the image; literally a residual image.
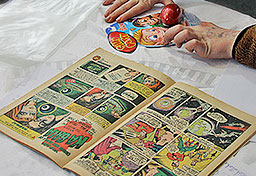

(Left: Silly Putty & Lois Lane No.52, October 1964. Right: the resulting utter dismal failure.)
In the course of researching this article, I tried various different brands of putty — among them "Original Silly Putty" — on a wide assortment of newspapers & magazines, both contemporary & vintage, including the copy of "Lois Lane No.52, October 1964" which contained the ad previously shown. None of them even came close to working, although the ink on the "Guardian Weekend" magazine did manage to come off all over our hands — just not onto the putty.
However — as a conjectural afterthought, perhaps it was ruminating on Silly Putty that led to the development of the Topps/Hasbro Rub-Offs/Rub-Ons transfer technology, which uses paper & wax instead of putty as the carrier for the image.
Talking of wax, here's a twist I hadn't heard of before:
![]()
(Sparky No.72, 4th June 1966)
"STAR LETTER — 'Did you know it is possible to transfer printed pictures from magazines on to candles? It is best to use a picture with strong black lines. Place the picture around the candle with the printed side touching the candle. Make sure that the paper is tightly held against the wax, and heat the paper with a match. After a few moments remove the paper, and you will find a beautiful picture on your candle!' — Transistor Radio and a Postal Order to P. Ryan, Dartford, Kent."
Embroidery Transfers — Transfer Pens & Pencils
![]()
![]()
(Embroidery transfer photos kindly provided by Doris and Wilf — eBay Seller 'dorisandwilfs'.)
Sewing or embroidery pattern transfers are sheets of paper through which one can mark with pins or chalk the outlines of a sewing pattern onto fabric (see also 'pouncing', below). This is a way of tracing out a form, and not an image; therefore it need not be discussed further here.
![]()
![]()
(Embroidery transfer photos kindly provided by Rosemary — sewmuchfrippery on Etsy.)
Hot Iron Transfer Pens (or Pencils) are used to achieve the same end; you place tracing paper over the design you wish to embroider, taking care to reverse it one way or another. Then you use the transfer pen or pencil to trace out the design. Next, you use a hot iron to transfer the ink of your tracing onto your fabric, by ironing over the reverse of your tracing paper while it is pinned face down onto the fabric. You can then embroider over the traced-out lines of the pattern, & finally you wash away the ink, leaving just the stitching. Again, this is transferring a design, not an image — but it would be remiss not to mention it. For further details on ironing technique, see "How to Apply a Vintage 1970s Iron-On Transfer"; for tracing paper technique, see immediately below.
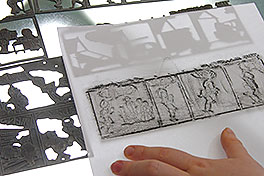
Tracing Paper:
Top left: tracing paper placed over artwork. Top right: tracing paper reversed, placed over paper, rubbed down.
Bottom left: image transferred to paper. Bottom right: original, tracing, & final image.
Tracing paper is translucent, so it may be placed over artwork whose outlines can then be marked out in pencil (1st photo).
The "image transfer" part of the process comes when the tracing paper is reversed onto the recipient surface — ordinary drawing paper, in this case. By rubbing over the drawing from the 'wrong' side of the tracing paper, the graphite from the pencil traces on the 'right' side can be transferred to the surface (2nd photo).
This creates at the very least a rough guide for further detailing (3rd photo).
Of course, the image has been reversed, & it is only the drawing of the artwork which has been transferred — not the artwork itself. In other words, it's an approximation whose accuracy depends on the skill of the tracing artist. (Thanks, Gregory — excellent work!)
If the reversal is a problem, then taking a second tracing of the first result will mirror the drawing yet again, bringing it back to the original orientation.
Pouncing:
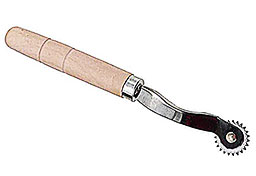
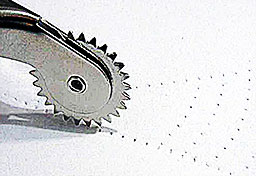
A pounce wheel & its perforations — photos courtesy of liraadelshte_0 on eBay
Pouncing also uses paper (or possibly light fabric). With this technique, the lines of the artwork are gone over with pinpricks rather than pencil. A pounce wheel (a wheel with pins around its circumference, connected to a handle) can be used to speed up the pricking process. The paper should be sanded down to remove the excess material pushed through by the pins.

My pounce bag!
Traditionally, a muslin bag full of soot or chalk (the pounce bag) is used for the next stage: the paper is fixed in position over the recipient surface, & the bag is dabbed over the pinhole outlines so that the powder escapes through the pinholes. This leaves a dotted outline on the surface, forming a guide to recreating the original artwork.
One major advantage of pouncing is that, having made a paper pattern, it can be used over & over again — which is ideal for repeating patterns or for mass production. Pounce. Pounce pounce pounce. Pounce pounce pounce pounce pounce.
Projection — Camera Obscura — Camera Lucida:
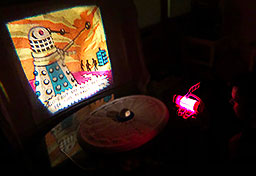
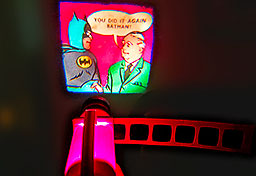
(Chad Valley "Give-A-Show" projector doing its thing.)
There are various methods for projecting artwork onto a recipient surface — overhead projection for one. Having been projected, the artwork can be traced over before the projector is switched off. Drawing on the back of the screen rather than the front has the advantage of your not getting in the way of the projector, but you'll need to reverse the projection first. Projection is, needless to say, an aid to drawing rather than a method of transferring an image; you have to create the image for yourself by drawing it.
Drawing what you see through a window directly onto its glass is the most basic form of projection drawing, where the sun is your projector; however, it will strain your eyes pretty quickly since the subject & the artwork can't both be in focus at the same time (except in the extreme case where the glass or paper is resting directly on the source artwork, which entails a light box, & takes us back to tracing paper).
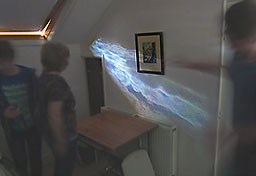
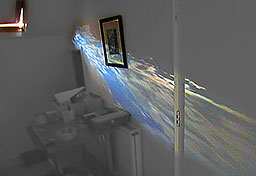
Camera Obscura accidentally set up at home, projecting city skyline through the 'pinhole' (at top left of these photos) onto the wall
The other two main optical aids to drawing are the Camera Obscura & the Camera Lucida. The former is a room or a box with a hole in it, resulting in an image projected onto the opposite wall — essentially a pinhole camera without film. The distortion in the photos above is, of course, due to foolishly projecting onto a side wall instead of straight ahead!
The Camera Lucida is more viable & interesting (not to mention portable); a combination of lenses, mirrors, & half-silvered mirrors allowing you to view both the subject & the paper on which it is to be drawn at the same time — allowing the artist to trace what they see.
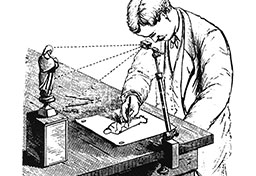
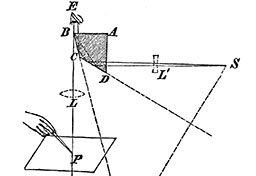
Camera Lucida illustrations from Wikipedia: "Drawing Small Figurine" —&— "Camera Lucida Diagram"
The eye piece contains a standard lens and a half-silvered lens (sometimes called 'one-way glass'). There is also a mirror which reflects the subject onto the half-silvered lens, so you can see both the reflection and the paper you're drawing on, together. It gives the illusion that the subject is already on the paper, & all you have to do is trace over its lines.
Although the Camera Lucida is often marketed as a children's toy, to use it well takes practice.
You can demonstrate the Camera Lucida principle incredibly simply with just a piece of glass; with your subject in front of you, & your paper on your lap, hold the glass flat above the paper & then tilt it 45º, so that you can see not only the subject reflected in it, but also the paper through it. (N.B.: if you can't get to see both, you've probably tilted the glass the WRONG 45º!)
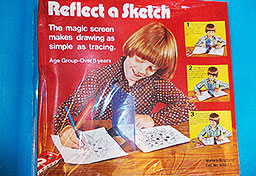
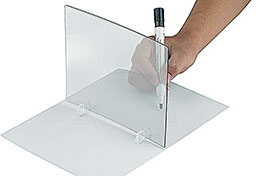
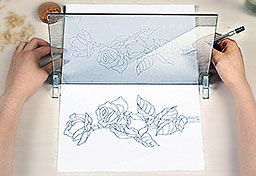
(Reflect-a-Sketch variations.)
Equally simple as the 45º glass is the 90º glass (as shown above), preferably half-silvered, although the results will be harder to achieve & liable to distortion. This is the kind of thing that's worth trying at least once, & then forgetting about. If it were that easy, we'd all be doing it all the time!
Brass Rubbing — Frottage:

("Brass Rubbing", V&A, plate 20.)

(Rubbing from a newspaper printing plate — "The Gambols".)
Brass Rubbing is the simple technique of placing a sheet of paper over a Church Brass (or any textured but reasonably flat surface) & rubbing it with a chalk or crayon. The drawing medium adheres to the raised surfaces, but not to the recesses; thereby an impression of the surface is made. However, no image is transferred; this is just an impression on paper of a pre-existing image.
Frottage is the extension of this principle as an artistic technique, using natural or found objects as a source of texture.
Pantographs:
A Pantograph is a mechanical device for automatically copying an image while it is being traced. By adjusting the arms correctly, the copy can be an enlargement, a reduction, or the same size as the source image. In the illustration below left, for example, as the stylus in the centre is moved over the lines of the source artwork, the pen on the right duplicates the movements at an increased scale, enlarging the image as it is copied. Note that the source image is not itself reproduced; it is the movement of the stylus as it traces (or fails to trace) the outlines of the source image that results in a scaled drawing. Therefore although the pantograph is an excellent drawing aid, judgement & drawing skills are still very much required.


(Left: demonstration of a Pantograph from Diderot's Dictionary. Right: Pantograph from "Rendering with Pen and Ink" by Robert W. Gill, Thames & Hudson 1973.)
Instructions (adapted) accompanying the above right illustration, which is set up for reduction rather than enlargement:
"A pantograph is used for enlarging and reducing of drawings, plans, patterns, etc.
"It is fixed by the screw clamp on the lefthand side of drawing board.
"In order to enlarge a drawing put the tracer in the middle and the lead point on the right. The left hand follows the original drawing with the tracer, whilst the right hand puts slight pressure on the lead point thus obtaining the enlargement.
"For reduction exchange tracer and lead point, and proceed inversely."
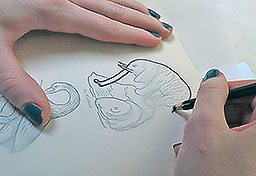
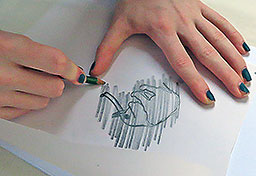
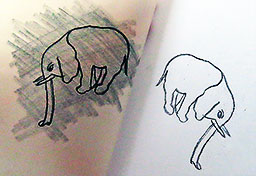
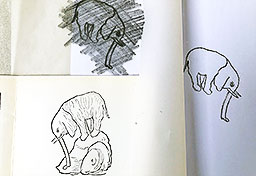
I bought a pantograph specifically for this article, & here it is clamped to my glass table so that I can enlarge a woodcut of an elephant:
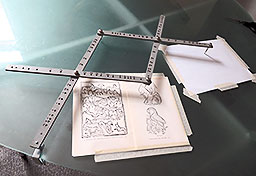
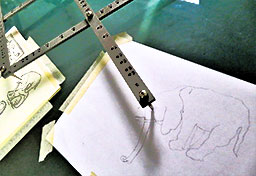
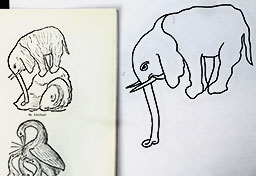
(Top left: set-up. Top right: tracing in progress. Bottom: original & enlargement, whose pencils have now been inked.)
Pantographs are widely available, ranging in quality from the exotically professional down to commonplace children's toys.
Stencils — Rotadraw:
![]()

(Left: typical example of a stencil font. Right: lettering stencil.)
Stencils are sheets with holes or grooves cut out of them; by placing them over the recipient surface & filling the missing lines or areas with graphic medium (e.g. biro ink, paint, or graphite from a pencil), the form of an image will be transferred. Just the form of it, though; this is not a true image transfer technique.


(Letraset Rotadraw photos kindly provided by Gini Jacques.)
Rotadraw (a technology owned by Letraset at one time) is the idea of a stencil turned into a simple game. Instead of drawing the whole stencil in one go, you rotate the disc & draw each numbered segment in sequence until the image is completed. The huge advantage over an ordinary stencil is that whereas stencils cannot let you draw figures within figures, or complete enclosed shapes, using a succession of segments means that complete, continuous complex forms can be produced without the stencil itself falling to bits. (The disadvantage of ordinary stencilling is what has led to the characteristically 'gappy' forms of stencil fonts, as illustrated above.)
Letraset's Other Transfer Products
Letraset didn't only produce their patented dry rub-down transfers, as is shown by this trade advert:

In particular, they mention "Tattooze" (temporary tattoos) & "Iron-Ons". Since those are the two main alternatives to Letraset's own patented dry rub-down transfer technology, this shows they had all options covered.
(N.B.: "POS" = "Point of Sale".)
That's it for this page.
To get a really good overview of how transfers work & what they're about, we recommend you read through all of the other pages in this article. They will repay careful reading!
Here are the links to those "What are Transfers?" article pages again in full:
- "What are Transfers?" (This page; see above) ↑
- Temporary Tattoos, including "How to Apply a Vintage 1960s Temporary Tattoo" →
- How to Apply a Waterslide Model Kit Transfer →
- Waterslide Transfers Applied to Drinking Glasses; plus Golly Transfers →
- The Letraset Type Lettering System →
- How to Apply Vintage 1959 Letraset Waterslide Lettering →
- Letraset's dry rub-down "Instant Lettering" →
- Heat Transfers, including "How to Apply a Vintage 1970s Iron-On Transfer" →
- How to Apply Letraset Dry Rub-Down Transfers →
- How Dry Rub-Down Transfers Work →
- Topps Rub-Offs, Hasbro Rub-Ons, & Trans-Action →
- Some Lovely Décalcomanies →
- How to Apply a Sticker (& other Sticker treats) →
- Stick'N'Lift →